
DNS Spoofing
The more you know, the less that surprises you… and that’s an advantage worth having. And consider yourself one of the very privileged few to get this advantage because these network security posts are so boring that only like 14 people ever read these. So… 14 out of roughly more than 7 billion people on this planet makes you very special! Statistically speaking, that makes you more elite than the “one-percenters” of society.
Anyway, that’s enough of my “pandering to the audience.” I’ll get on with the actual topic.
Put as simply as my humble understanding can allow, these data packets carry the stuff we see on the internet, among many other types of data. The “many other types of data” is where hackers can fiddle around and change what you actually see.
It’s helpful to think of these packets as like onions, as in they have many layers. And so the first level to a packet is actually called a layer. Within the layers are fields and/or sub-layers, which can also have fields or more sub-layers, and so on…
Anyway, that’s a grossly oversimplified explanation of a data packet, but you can get a better idea of how they appear programmatically in the first post of this series … and here’s a more technical description of what a data packet is
DNS Spoofing is called what it is, because the strategy involves spoofing (modifying) the DNS layer of a data packet. There’s roughly three ways to carry out this strategy:
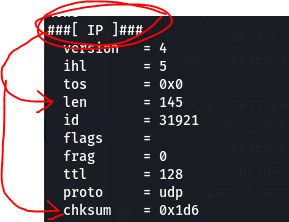
The screenshots below refer to a spoofing attack that carries out the 3rd strategy listed above. To incorporate this strategy, a hacker will gain m.i.t.m. status and then capture and modify response packets sent to the user from the internet. The screenshots will show you which fields to check for if you suspect this attack.
Now that we have a little more context on what a data packet is, we can understand a little better what we’re looking at when we examine a potentially spoofed packet.
To do this yourself, please refer to the code I shared in the previous article, and here’s a little background on running it if you’re so inclined:
The code was tested on a Kali Linux virtual machine through VMware Workstation 16 Player. It should be able to run on any OS as long as you have Python 2 on your computer. Feel free to copy the code, refactor it, tweak it, whatever.
As mentioned it’s python 2, but I’m sure a simple tweak can get it to work on python 3.
Furthermore, to develop this program,netfilterqueue and scapy were imported.
So, when examining a data packet for spoofing check these fields:

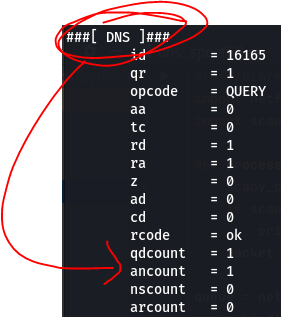
Now, to verify if you’ve been spoofed or not, just compare the suspected spoofed packet with a data packet you know not to be spoofed and see if you can find any discrepancies… or any inconsistencies within the spoofed packet itself. For example, a quick one to note would be the ancount field, as shown in the screenshot above. If the number doesn’t match the actual number of response answers received then we have a RED FLAG.
Anyway, that’s all for now. I hope this quick and dirty explanation has helped you gain a little more digital situational awareness. I encourage you to do more research on this because I only provide a broad overview of this and more knowledge is better.
If you enjoyed reading this article, support my writing by signing up for a Medium subscription.
Medium is a writing platform where writers from all over the world showcase their writing, covering any topic you can think of.
With a subscription you'll have unlimited access to all these writers and email notifications for my newly posted articles.
...but never fear, if you really enjoy my cybersecurity articles, then they will always be available here to read for free, for you!
DNS Spoofing

All of the Malware

Hardening