
How to Code a Network Scanner to See If Anyone Is Camping-out on Your Wi-Fi
It’s kind of like a serial number, an example would look like this:
7g:ru:43:55:g7:23
The number is a series of six sets of alphanumeric pairs. It is associated with any network interface device used to access the internet. So, that would include a network card that is typically inside of a laptop, for example.
I got the points below from a Quora answer to the question “What are the risks of changing your device’s MAC address, will the risk still exist after it is changed back to its original?”:
While I typically find Quora answers to be too biased, this answer had some objective points worth sharing, at least in my humble opinion. However, I did disagree with their statement “It may be worth noting that you also don’t *gain* anything by changing MAC addresses.” Obviously, I don’t find this to be true, otherwise I wouldn’t be sharing any of this. Anyway, let’s carry on.
If you’re following along, this is the command we’ll be using most during this demonstration. Here’s the documentation for ifconfig
Nothing fancy, to use the command just open a terminal/shell/command line window, whatever you prefer calling it, and type ifconfig
It will display the MAC address of every network adapter to which your device is connected. For most laptops, that means just the built-in wireless card. However, if you have a USB wireless adapter plugged-in, or any other network interface device, you’ll see that MAC address, as well. Anyway, after you type ifconfig and press enter, then you should see an output like the screenshot below.
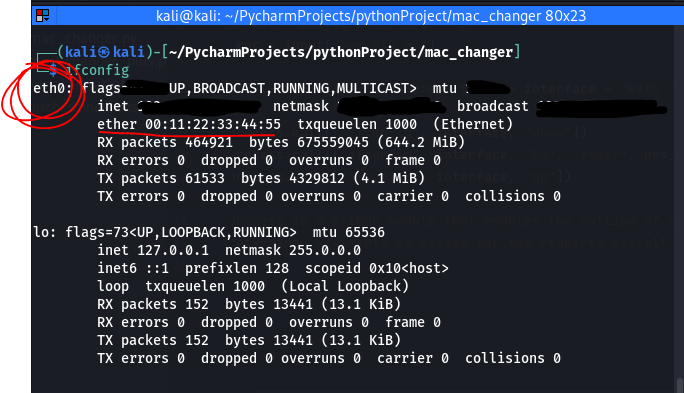
When looking at the output from ifconfig, the laptop’s internal wireless card is likely to be labeled as eth0 (or wlan0 if you’re using a USB wireless adapter), which is circled in red, above. Then look for the MAC address, which will be labeled ether. You can find that underlined above, as well. You might notice that my MAC address looks kind of generic, well that’s because I changed it to protect my privacy before taking the screenshot. I wrote down my original MAC address on a piece of paper before changing it though, so I could revert back to the original MAC in case I had any Wi-Fi connectivity issues. No issues though, so all was good. However, I do recommend writing this down, just in case.
The equivalent of ifconfig for Windows is ipconfig /all. Just gotta change one measly letter, and then add the argument /all. Here’s the documentation for ipconfig.

Anyway, it’s not exactly the same. It is equivalent in the sense that it has the same functionality, but the output looks different. For example, MAC address will be referred to as “Physical Address.”
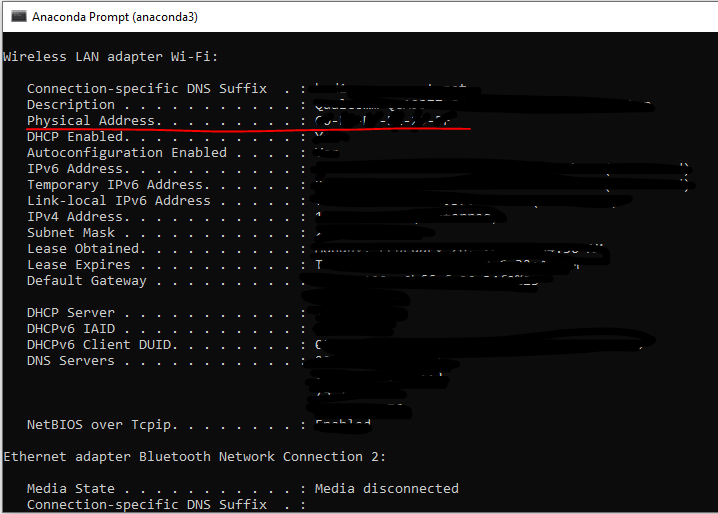
Furthermore, this command provides a lot more information than just the MAC address, as you can see in the screenshot above. Items in the left column have been redacted for my privacy.
We’ll be using a couple of options from the list available for ifconfig.
ifconfig <interface> down we’ll type the name of the interface, in this case that will be eth0, according to the output shown in the first screenshot. down will turn off the internal wireless card (a.k.a. eth0) because we can’t change the MAC address without turning it off.ifconfig <interface> hw ether <new_mac> Here is where we change the MAC. hw refers to hardware and ether refers to the MAC address and then just type a random MAC address number where it says <new_mac>ifconfig <interface> up At this point, the MAC address has been changed and the wireless card needs to be turned back on. That’s what the up option does, but remember to specify the interface first, which is stilleth0.ifconfig. If you want to revert back to your original MAC address, follow the same three steps as above, but with your original MAC address that you remembered to write down before changing it.I called mine mac_changer.py
    #!usr/bin/env python
    import subprocess

    interface = input("Interface > ") ## use this for python3
    new_mac = input("new MAC > ") ## use this for python3

    #interface = raw_input("Interface > ") ## use this for python2
    #new_mac = raw_input("new MAC > ") ## use this for python2

    print("[+] Changing MAC address for " + interface + " with " + new_mac)

    subprocess.call(["ifconfig", interface, "down"])
    subprocess.call(["ifconfig", interface, "hw", "ether", new_mac])
    subprocess.call(["ifconfig", interface, "up"])

    '''subprocess is a python module that enables the calling of commands with
    predetermined arguments as needed for the required overall functionality'''
Check it out! Copy it, refactor it, make it your own! Give it to your grandma, I don’t give a f***! I feel that this is important to share. If you’re really cool, though, then you’ll refactor the code to make it work for Windows.
So, as you can see, this is a pretty basic algorithm but we can see how we’re using the subprocess module in tandem with ifconfig. Upon running the algorithm, it will ask for the user to input the interface’s name (this is eth0, in most cases) and the new MAC address you want to reassign it. Then it will change the MAC based on the user input.
There you go. You just got a little bit savvier with computers. I hope you enjoyed reading. Thanks for checking it out.
If you enjoyed reading this article, support my writing by signing up for a Medium subscription.
Medium is a writing platform where writers from all over the world showcase their writing, covering any topic you can think of.
With a subscription you'll have unlimited access to all these writers and email notifications for my newly posted articles.
...but never fear, if you really enjoy my cybersecurity articles, then they will always be available here to read for free, for you!
How to Code a Network Scanner to See If Anyone Is Camping-out on Your Wi-Fi

Let’s Go ARPing!

Man-in-the-Middle, ARP Spoofing???