
MAC Address Spoofing and YOU!
This is a lengthy process. Doing this fast, it takes about 3 hours for me. However, the first couple of times, it took me days… but hey, they say “growth is in the struggle.” Anyway, I hope I can save you some of the headaches I endured by sharing my documentation of this process.
A little context on this tech stack, a few months ago I worked at an ecommerce company as their web developer. This was the tech stack that they used to operate their ecommerce websites. I’ve never done much work setting up a server to host a website so I took on the challenge to replicate it. Don’t get excited though, because nothing is special about this tech stack. It’s run-of-the-mill stuff, and other ‘mom-and-pop’ ecom companies across the world use the same stack.
One thing worth noting about this stack is that you could use it to scale up to a million dollar ecom company because the Magento platform was developed to accommodate that type of sales volume.
Anyway, whatever your goal is, I hope you find some value in this long-ass documentation. It’s really boring so good luck and let’s get started!
4. Select the Ubuntu server 20.04, 64-bit (x86)
5. Select the t.2 micro instance type and click “Next: Configure Instance Details” (I choose this because it’s free.)
6. No need to change anything here, unless you want. Just scroll down and stick with all of the default settings, then click “Next: Add Storage”
7. Change the storage size from whatever the default is to 30 GiB, then click “Next: Add tags”
8. Adding tags can be skipped and click “Next: Configure Security Group”
9. Configure your security settings (rename the “Security group name” if you want); click “Add Rule” button to add other network traffic protocol types. Specify “Source” as “Anywhere” OR specify “Source” as “Custom” if you know your own IP address.
The first screenshot below shows specifying “Anywhere.” The second one shows specifying “Custom” and then typing one’s own personal IP address.
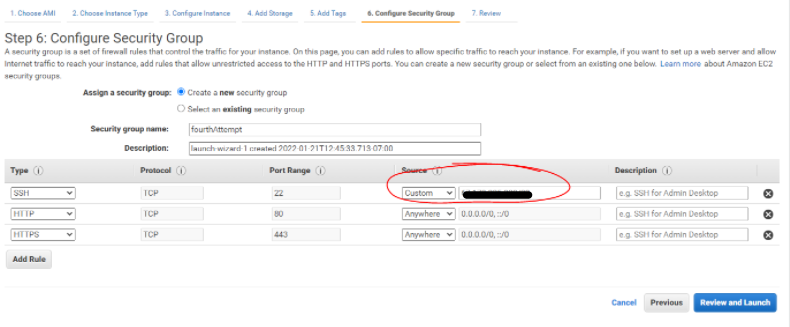
10. Add the HTTP and HTTPS protocol types, specify “Source” as “Anywhere” for each of them and then click “Review and Launch”
11. Take a moment to review the configurations that you just set and then click “Launch”
12. After clicking the “Launch” button a window will pop-up and prompt you to create a key pair. This is important because this is basically your key to accessing your new server remotely.
13. After launching the instance, you’ll be redirected to a page like the one below, you can explore around and click some of the links but they can be skipped. To get to the next step just scroll down to the bottom of the page and click “View Instances”
14. This Step Can Be Skipped. Skip ahead to step 25 if you’re not using a custom URL address: Associate your new instance to your Elastic IP address; in the left-hand side menu click on “Elastic IPs”
15. If you have an Elastic IP already, select it with the check box and then click the “Action” dropdown box and click “Associate Elastic IP address”
If you don’t have an Elastic IP, that’s fine. You can skip ahead to step 25
16. In the next window, specify the instance to which you want to associate the Elastic IP (all of your instances should automatically appear for you to choose from when you click in the text box, same for the “Private IP address” text box)
17. Check the box next to “Allow this Elastic IP address to be re-associated” and then click “Associate”
18. SKIP TO Step 25 if you don’t have or want to configure a custom domain. To configure the custom domain purchased from the Amazon registrar Route53 (you can purchase a custom domain from any other registrar, but I found it easier to configure a domain from the AWS registrar). Here’s the Amazon documentation regarding this process. Go to Route53 from the AWS Services menu in the top left corner of the window. Refer to the screenshot below:
SIDE NOTE: To continue with this segment of the process is not necessary, but to do it you’ll have to have already purchased a domain from the amazon registrar before doing this segment. SKIP AHEAD to STEP 25 if you don’t want to purchase a domain.
19. In the “Domain Name” column, click on the address of the domain you want to configure
20. On the next page, Click “Create record”
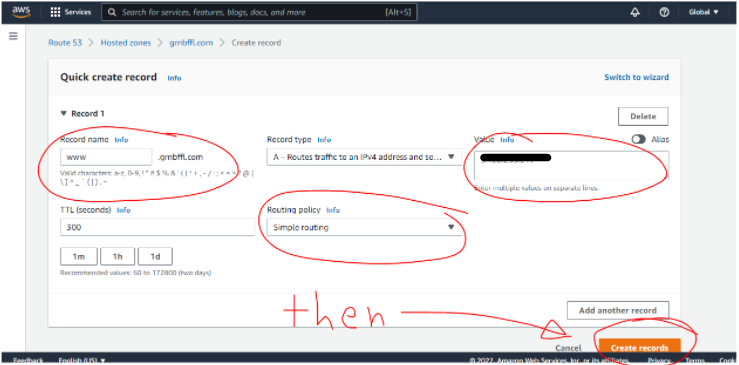
21. Edit the following:
Routing policy: Choose the applicable routing policy. For more information, see Choosing a routing policy.
Record name: Enter the domain name that you want to use to route traffic to your EC2 instance. The default value is the name of the hosted zone.
For example, if the name of the hosted zone is example.com and you want to use acme.example.com to route traffic to your EC2 instance, enter acme.
Value/Route traffic to: Choose IP address or another value depending on the record type. You’ll need to get the public IP address for your instance which can be found on your Instance’s dashboard. Look for “public IPv4 address”
Record type: Choose A — IPv4 address
TTL (seconds): Accept the default value of 300.
Refer to the screenshot below then click “Create records” when you’re finished
22. After clicking on “Create records” you’ll be redirected and you should see a success message
23. Navigate to the EC2 Instances dashboard on you AWS account
24. At this point, your instance is ready to be accessed remotely. Do so by checking off the box next to your new instance and click the “Connect” button on your EC2 Instances dashboard
25. After clicking on the “Connect” button, you will be taken to another window
26. Open up a CLI terminal
27. Navigate to the directory where you have the .pem file, if you just downloaded it then it should be in your “Downloads” folder
28. now type and run: chmod 400 <your_file_name>.pem
29. Then copy and paste the ssh command as provided by AWS in the example, under Step. 4 of Connect to Instance (that ‘example’ will be unique to your AWS instance)
As you you can see I received an error and that’s because I had another .pem file previously associated with my Elastic IP address so I had to edit the “known-hosts” file in the .ssh directory. If this is your first time launching an instance then you won’t have this issue, however if you attempt this tutorial several times then you’ll have to do this troubleshooting.
ssh-keyscan -t rsa server_ip yourIPaddress
known_hosts fileknown_hosts file in the .ssh directory of my local machine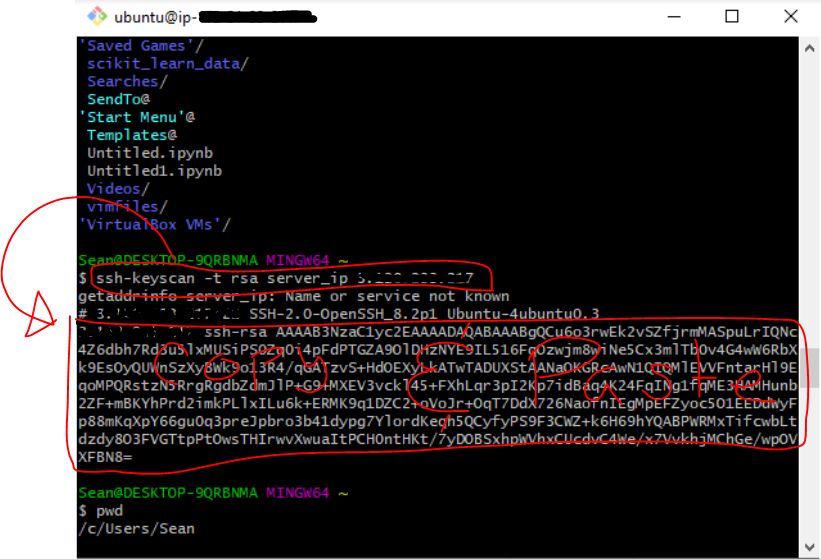

known-hosts file I can successfully access my AWS instance remotely from my local machine30. When connecting to the server for the first time after updating the “known-hosts” file, the command line will ask “are you sure you want to continue connecting?” and there you will want to copy and paste the string above the question that starts with “SHA”. refer to the screenshot below:
31. Once you login and have remote access to your instance, update and upgrade the server by running the commands:
sudo apt update
sudo apt upgrade
32. Now is time to create the SWAP memory since we chose the free t2.micro instance type and need a workaround to accommodate the 2 GiB requirement to run Magento
Type this series of commands in your terminal from the home directory of your instance:
sudo vi swap.sh — this creates and lets you edit your new swap file
#!/bin/bash — add this to the top of the new swap file, save and exit
sudo fallocate -l 4G /swap.img
ls -lh /swap.img
sudo chmod 600 /swap.img
ls -lh /swap.img
sudo mkswap /swap.img
sudo swapon /swap.img
echo ‘/swap.img none swap sw 0 0’ | sudo tee -a /etc/fstab
cat /etc/fstab
cat /proc/sys/vm/swappiness
sudo sysctl vm.swappiness=10
33. Then go to the /etc/ directory to edit the sysctl.conf file
cd /etc/
sudo vi sysctl.conf
vm.swappiness=10
34. Return back to your main directory, after exiting the sysctl.conf file type and run:
cd
sudo chmod +x swap.sh
sudo sh swap.sh
35. Then verify that the SWAP memory has been created by running the command:
free -h
36. Now we’re ready to install the Apache server
Types these commands:
sudo apt update
sudo apt install apache2
sudo systemctl start apache2.service
sudo systemctl enable apache2.service
37. Then verify it has downloaded by running the command:
apache2 -v
38. Then verify the apache server is up and running in the browser by typing the instance’s IP address in an internet browser
39. Next, ensure that apache will be automatically started everytime you roboot your server by running the following command:
sudo systemctl is-enabled apache2
40. Now, time to install MySQL and create the database. Type the command:
sudo apt install mysql-server
41. Verify the download by running:
mysql -V
42. Next, run the following command to remove insecure default settings:
sudo mysql_secure_installation
43. Configure password access for the MySQL root account
For much of the rest of this tutorial I used the following guide to help me finish the installation: https://www.thecoachsmb.com/how-to-install-magento-2-on-ubuntu/
44. Test login to your MySQL root user
45. configure a password for the MySQL Root Account Login with the root user:
ALTER USER ‘root’@’localhost’ IDENTIFIED WITH mysql_native_password BY ‘your_password’;
NOTE: replace ‘your_password’ with something of your choosing, I just used ‘magento2’ for the sake of learning but if this is for something for more than just learning then you should consider something more secure
46. Verify the mysql.user table with the following command:
SELECT user,authentication_string,plugin,host FROM mysql.user;
47. Create a new mysql user for the magento2 project
exitCREATE USER ‘your_own_username’@’localhost’ IDENTIFIED BY ‘your_own_password’;
ALTER USER ‘your_own_username’@’localhost’ IDENTIFIED WITH mysql_native_password BY ‘your_own_password’;
GRANT ALL PRIVILEGES ON *.* TO ‘your_own_username’@’localhost’ WITH GRANT OPTION;
SELECT user,authentication_string,plugin,host FROM mysql.user;
48. Exit MySQL
49. Finally, update your APT repository. After exiting MySQL, type:
sudo apt update
50. Install PHP and Required Extensions. run the following:
sudo apt install php7.4 libapache2-mod-php7.4 php7.4-common php7.4-gmp php7.4-curl php7.4-soap php7.4-bcmath php7.4-intl php7.4-mbstring php7.4-xmlrpc php7.4-mysql php7.4-gd php7.4-xml php7.4-cli php7.4-zip php7.4-json
51. Verify the download, type:
php -v
52. Now edit the /etc/apache2/mods-enabled/dir.conf file
Type:
sudo vi /etc/apache2/mods-enabled/dir.conf
Move index.php to the front of the list like in the screenshot below
Save and exit
53. then type:
sudo phpenmod mbstring
54. Enable apache rewrite module:
sudo a2enmod rewrite
then type:
sudo systemctl restart apache2.service
55. Configure the PHP settings
php -i | grep "Configuration File"
The above command pulls up all of the php information then ‘pipes’ that info to be searched with the grep command to specifically find “Configuration File”
56. Now that you have the directory for the file, go edit the php.ini file:
sudo vi /etc/php/7.4/cli/php.ini
max_execution_time
max_input_time
memory_limit
57. Reload the apache2 server. Type:
sudo systemctl reload apache2
58. Install and Configure ElasticSearch, first install java. Type:
sudo apt install openjdk-16-jdk
59. Verify the download
java -version
60. Install curl package
sudo apt install curl
sudo curl -sSfL https://artifacts.elastic.co/GPG-KEY-elasticsearch | sudo gpg — no-default-keyring — keyring=gnupg-ring:/etc/apt/trusted.gpg.d/magento.gpg — import
61. Then we’ll add the Elasticsearch repository to the system using the following command:
sudo sh -c ‘echo “deb https://artifacts.elastic.co/packages/7.x/apt stable main” > /etc/apt/sources.list.d/elastic-7.x.list’
… and modify the permissions:
sudo chmod 666 /etc/apt/trusted.gpg.d/magento.gpg
62. Update the cache, and then install the ElasticSearch package:
sudo apt update
sudo apt install elasticsearch
63. Reload it by running:
sudo systemctl daemon-reload
64. Then Start and Enable the Elasticsearch service by typing:
sudo systemctl enable elasticsearch.service
65. Then type:
sudo systemctl start elasticsearch.service
Wait a moment, this step takes a few minutes.
66. Now we’re ready to configure Elasticsearch. Go to edit the elasticsearch.yml file
67. Edit the elasticsearch.service file. Type:
sudo vi /usr/lib/systemd/system/elasticsearch.service
68. Start elasticsearch by typing:
sudo systemctl daemon-reload
sudo systemctl restart elasticsearch.service
69. Now test if elasticsearch is working by making a GET request with curl
curl -X GET ‘http://localhost:9200’
70. Install Composer, Type the following commands:
curl -sS https://getcomposer.org/installer -o composer-setup.php
sudo php composer-setup.php — install-dir=/usr/bin — filename=composer
71. Now verify it has been installed by typing:
composer
Now we have our environment ready to install Magento onto the remote server.
72. Go to the html folder html by typing:cd /var/www/html
73. Type this to download the free community edition:sudo composer create-project — repository-url=https://repo.magento.com/ magento/project-community-edition <install-directory-name>
For <install-directory-name> ….replace that with a name of your choosing like in the example below where I use ‘magento2’
sudo composer create-project — repository-url=https://repo.magento.com/ magento/project-community-edition magento2
74. It will ask you the following:
75. Now you have to login or create an account at https://marketplace.magento.com/
At this account is where you’ll find your key pair to allow you download from the the magento (adobe commerce) repository
76. Click on the link that says “Access Keys” after logging into your magento.commerce.com account. This link will take you to your page that has your credentials for the username and password to download the magento2 repo via composer.
77. Say ‘yes’ to storing your credentials and press enter
78. Set the permissions:
Go to the directory of the magento2 installation
cd /etc/www/html/<your_directory’s_name>
79. Set Permissions:
sudo find var generated vendor pub/static pub/media app/etc -type f -exec chmod g+w {} +
sudo find var generated vendor pub/static pub/media app/etc -type d -exec chmod g+ws {} +
sudo chown -R <Magento user>:<web server group> .
⇒ sudo chown -R ubuntu:www-data .
sudo chmod u+x bin/magento
OR
sudo find . -type f -exec chmod 644 {} \;
sudo find . -type d -exec chmod 755 {} \;
sudo find var pub/static pub/media app/etc generated/ -type f -exec chmod g+w {} \;
sudo find var pub/static pub/media app/etc generated/ -type d -exec chmod g+ws {} \;
sudo chown -R <Magento user>:<web server group> .
sudo chmod u+x bin/magento
This block of code came from this magento.stackexchange answer
BUT use ‘ubuntu’ (ubuntu is the default user name on an AWS ubuntu instance) for the <Magento user> as shown in the screenshot below and this solves the error “Proxy does not exist”
80. Here’s where we configure the installation
php bin/magento setup:install — base-url=<your_own_URL> — db-host=localhost — db-name=magento2 — db-user=magento2 — db-password=magento2 — admin-firstname=admin — admin-lastname=admin — admin-email=admin@admin.com — admin-user=admin — admin-password=admin123 — language=en_US — currency=USD — timezone=America/Denver — backend-frontname=admin — use-rewrites=”1" — search-engine=elasticsearch7 — elasticsearch-host=localhost — elasticsearch-port=9200
IMPORTANT: make sure you have no typos. The error below came from not having two hyphens before the parameter
81. Change the documentRoot to Pub
This is found in the 000-default.conf file in the directory: /etc/apache2/sites-available/
change the directory to pub, next to the DocumentRoot directive:
82. Then add:
<Directory “/var/www/html”>
AllowOverride all
</Directory>
Without this bit of code, the page won’t render any of the CSS
83. Restart the server:
sudo systemctl restart apache2.service
84. Now the cache must be flushed for developer and production mode. This will also show how to switch between the two modes
a. Switch to production mode:
sudo php bin/magento deploy:mode:set production
b. Flush the cache:
sudo php bin/magento cache:flush
c. Switch to developer mode
sudo php bin/magento deploy:mode:set developer
d. Flush the cache:
sudo php bin/magento cache:flush
e. Delete cached files:
sudo chmod -R 777 var pub/static generated generated/
85. Upgrade the database and deploy the static-view files
a. php bin/magento indexer:reindex
b. php bin/magento setup:upgrade
c. php bin/magento setup:static-content:deploy -f
d. php bin/magento cache:flush
86. Test the url address in the browser to see if the website renders properly. It should look like the screenshot below:
87. Disable the 2factor authentication to login to the admin page. In the CLI, TYPE: php bin/magento module:disable Magento_TwoFactorAuth
88. Access the admin page. In the browser, TYPE: <your_url>.com/admin
89. Login
90. You did it!
If you’re like me and not familiar with setting up remote servers and configuring domains, etc… then this might take a while and you’ll probably have to reference several resources to get through this process. No problem, that’s what I had to do too.
I hope this humble step-by-step guide helped you. Good luck and thanks for reading.
If you enjoyed reading this article, support my writing by signing up for a Medium subscription.
Medium is a writing platform where writers from all over the world showcase their writing, covering any topic you can think of.
With a subscription you'll have unlimited access to all these writers and email notifications for my newly posted articles.
...but never fear, if you really enjoy my cybersecurity articles, then they will always be available here to read for free, for you!
MAC Address Spoofing and YOU!

Virtual Machines, Virtualization, and Using This Stuff for YOUR Own Personal Cyber Security

How to Manually Change Your MAC Address and a Teeny, Tiny, Simple, Little Python Algorithm to Do It for You on Linux or Apple Operating Systems